QATrack+ Installation & Customization
There is already a guide to install QATrack+, aimed to both install and customize QATrack+ on Windows. This guide pretends to help you in case you have a proxy server at your institution and go deeper through customizing your QATrack+ server.
Let’s install prerequisite stuff
First of all, you will need SQL Server 2016-2019. SQL Express is also a valid option, so in my case I downloaded and installed SQL2019 Express, along with SQL Server Management Studio 20.2 and ODBC Controller for SQL Server.
Then, install Google Chrome if you don’t have it already. Next, download and install Internet Information Services, URL Rewrite Module and Application Request Routing. Check this link before installing URL Rewrite and Application Request Routing.
Finally, you will need any Python 3.9.X version, VS Code and Github Desktop (I prefer this one to work with repositories) and Git (in case we need to configure our PC, choose “Use git from the Windows Command Prompt”).
When installing Python, check “Install launcher for all users” and “Add Python 3.9 to PATH”, then click on “Customize Installation” and, on the following window, leave all defaults choices and click “Next”. On the third window, make sure to check “Install for all users” before clicking “Install”.
Configure GitHub to work with a proxy server
If you have a proxy server at your institution, you need to tell Git/Github desktop how to reach your repositories; run the following command in a powershell:
git config --global http.proxy <your-proxy-server>:<port-number>
git config --global https.proxy <your-proxy-server>:<port-number>
If you want to undo this changes just copy and paste the following command:
git config --global --unset http.proxy
git config --global --unset https.proxy
Clone repository and install all dependencies
Open a Windows PowerShell terminal and create the following directory:
mkdir C:\deploy
cd C:\deployNow, it’s time to clone your repository. You may do it directly from the PowerShell terminal by copying the following command:
git clone https://github.com/qatrackplus/qatrackplus.gitOnce cloned, setup the Python environment and install all dependencies:
mkdir venvs
python -m pip install --upgrade pip
python -m venv venvs\qatrack31
.\venvs\qatrack31\Scripts\Activate.ps1
python -m pip install --upgrade pip
cd qatrackplus
git checkout v3.1.1.4
pip install -r requirements\win.txt
Create your SQL database
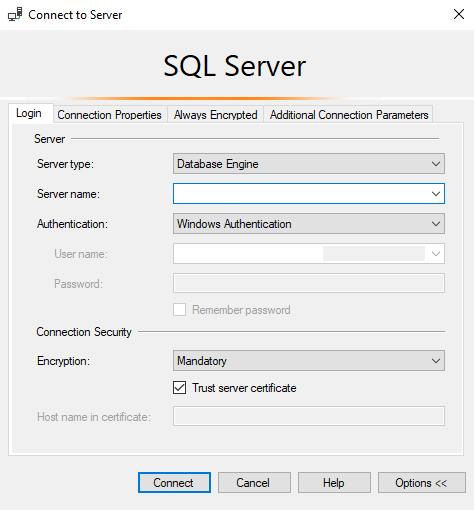
Open SQL Server Management Studio, connect to your database and make sure you have checked “Trust server certificate”.
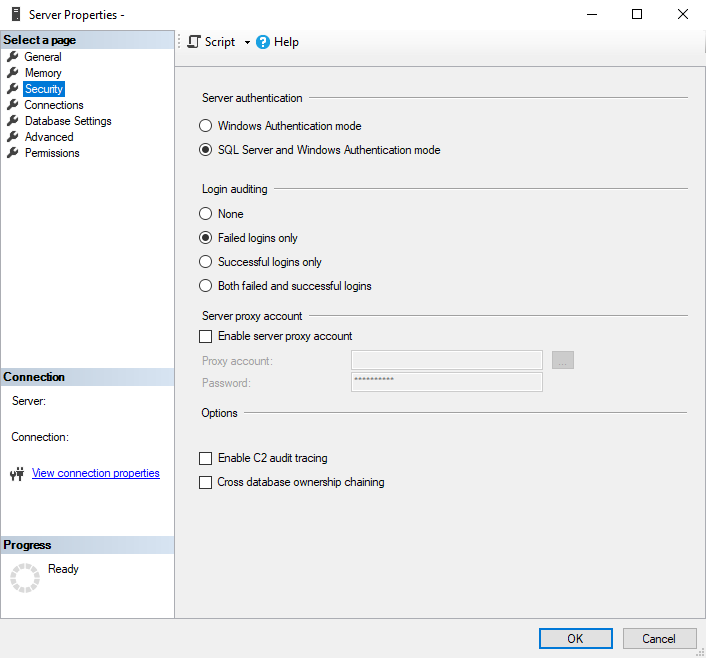
When successfully logged in, right click on your server name, located in the Object Explorer panel, and go to Properties. In the dialog window, click on Security and check SQL Server and Windows Authentication mode is selected. After that, click on OK, right click again on your server name and click on Restart.
Now, you are ready to create our new database! Again, in the Object Explorer panel right click over Databases folder and select New Database…. You have to name it as “qatrackplus31” and click OK.
Back in the Object Explorer frame, click this time in Security folder and select New -> Login…. Select SQL Server Authentication and enter as login name “qatrack”; set whatever password you want but make sure to uncheck Enforce Password Policy (this is just to be able to set simple password like pass123) before clicking OK. Then, repeat this process for the user “qatrack_reports”.
When both logins are created, it’s time to create their corresponding users. Expand Database folder and then expand “qatrackplus31” database to right click on the Security folder and select New -> User…. First, enter “qatrack” as user name and login name and, in the Membership page, check “db_ddladmin”, “db_datawriter”, “db_datareader” and “db_owner”. Next, enter “qatrack_reports” as user and login name and, in the Membership page, check “db_datareader”.
Configure your QATrack+ settings
Copy the local_settings.py file by:
cp deploy\win\local_settings.py qatrack\local_settings.pyand to make things easier, just comment the ‘readonly’ database and do not set any user nor password for the default database.
# Set to True to enable debug mode (not safe for regular use!)
DEBUG = False

DATABASES = {
    'default': {
        'ENGINE': 'sql_server.pyodbc',
        'NAME': 'qatrackplus31',
        'USER': '',
        'PASSWORD': '',
        'HOST': 'COMPUTER_NAME\SQLEXPRESS',  # leave blank unless using remote server or SQLExpress (use 127.0.0.1\SQLEXPRESS or COMPUTERNAME\SQLEXPRESS)
        'PORT': '',  # Set to empty string for default. Not used with sqlite3.
        'OPTIONS': {
            'driver': 'ODBC Driver 17 for SQL Server',
        },
    },
    # 'readonly': {
    #     'ENGINE': 'sql_server.pyodbc',
    #     'NAME': 'qatrackplus31',
    #     'USER': 'qatrack_reports',
    #     'PASSWORD': 'qatrack_reports',
    #     'HOST': 'COMPUTER_NAME\SQLEXPRESS',  # leave blank unless using remote server or SQLExpress (use 127.0.0.1\SQLEXPRESS or COMPUTERNAME\SQLEXPRESS)
    #     'PORT': '',  # Set to empty string for default. Not used with sqlite3.
    #     'OPTIONS': {
    #         'driver': 'ODBC Driver 17 for SQL Server'
    #     },
    # }
}

ALLOWED_HOSTS = ['127.0.0.1', 'localhost', "*"]Confirm you can connect to your database by running:
python manage.py showmigrations accountswhich should show output like:
accounts
    [ ] 0001_initial
    [ ] 0002_activedirectorygroupmap_defaultgroup
    [ ] 0003_auto_20210207_1027
Then, you will create the database tables and configure your database by running:
python manage.py migrate
python manage.py createsuperuser
python manage.py createcachetable
python manage.py collectstatic
Get-ChildItem .\fixtures\defaults\*\*json | foreach {python manage.py loaddata $_.FullName}
Remember that if you want to add new fields when storing data, you have to make and create the migrations by:
cd C:\deploy
.\venvs\qatrack31\Scripts\Activate.ps1
cd qatrackplus
python manage.py makemigrations
python manage.py migrate
python manage.py showmigrations
which should output things like:
    [X] 0001_whatever
    [X] 0002_whenever
    [X] 0003_wherever
    ...
